Welcome to FC Connexion TV! This guide will walk you through setting up your new EVO Force-1 device. The entire setup process typically takes 15-20 minutes to complete.
TABLE OF CONTENTS
- EVO Force-1 Initial Setup: Step-by-Step Guide
Before You Begin
What's Included in the Box
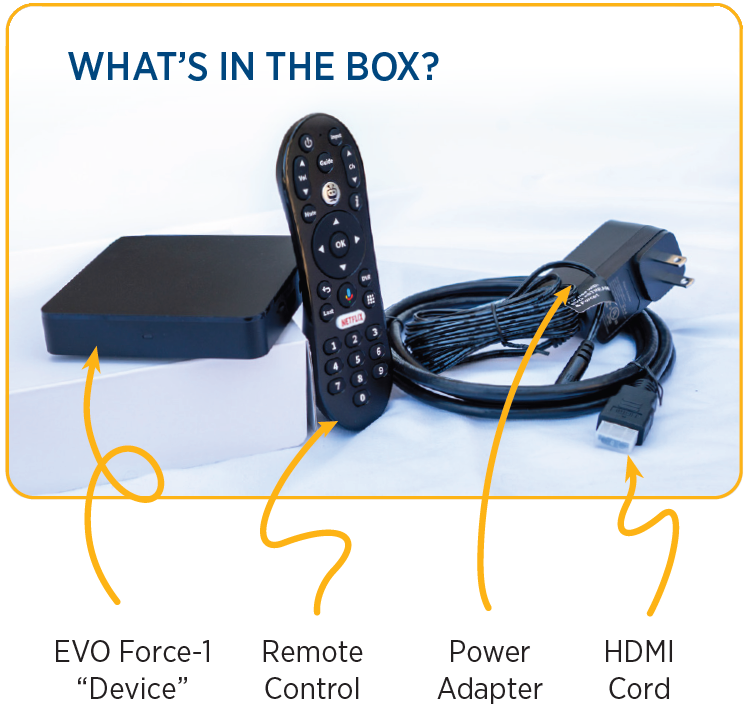
Your EVO Force-1 package contains:
- EVO Force-1 device
- Remote control with batteries
- Power adapter and power cable
- HDMI cable
- Quick start guide
Note: If any items are missing from your package, please contact FC Connexion Technical Support at 970-207-7873.
Required Items Checklist
Before starting setup, make sure you have:
- Your TV with an available HDMI port
- Wi-Fi network name (SSID) and password
- Google Account login (optional but strongly recommended)
- FC Connexion account User ID and Password
- Surge-protected power outlet or power strip (recommended)
Important: A Google Account is not required but is strongly recommended. It allows you to install additional apps from the Google Play Store and provides a more personalized viewing experience.
Physical Setup
Installing Batteries in Remote
- Open the battery compartment on the back of your remote control
- Insert the provided batteries, paying attention to the +/- orientation markings
- Close the battery compartment
- Test the remote by pressing any button - an amber light should display at the top of the remote when it's powered on
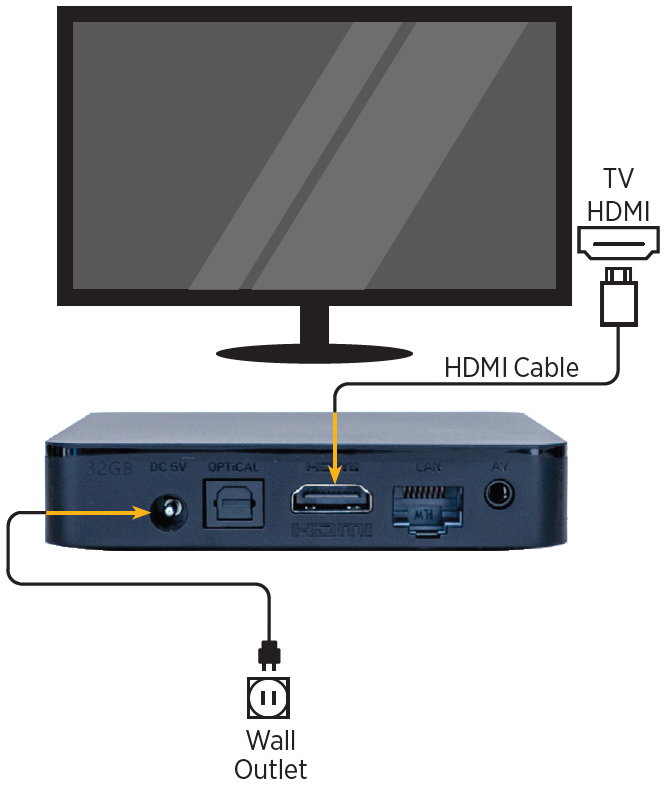
Connecting HDMI Cable to Device and TV
- Take one end of the HDMI cable and connect it to the HDMI port on your EVO Force-1 device
- Connect the other end of the HDMI cable to any available HDMI port on your TV
- Make note of which HDMI port number you used (HDMI 1, HDMI 2, etc.) - you'll need this information in the next step
Tip: If you have multiple HDMI ports on your TV, HDMI 1 is typically the easiest to remember.
Plugging in Power Adapter
- Connect the power cable to the power port (labeled DC 5V) on your EVO Force-1 device
- Plug the power supply into a wall outlet or surge-protected power strip
Note: The device will automatically power on once connected to electricity - there is no power button on the device itself.
Turning On TV and Selecting Correct HDMI Input
- Turn on your TV using your TV's remote control (not the EVO remote)
- Press the "Input" or "Source" button on your TV remote
- Select the HDMI input that corresponds to the port where you connected your EVO device
- The "Pair Your TV Remote" screen should appear on your TV display
Troubleshooting: If the pairing screen doesn't appear, verify that you've selected the correct HDMI input. If you're unsure which input to use, refer to your TV manufacturer's documentation or try cycling through all available HDMI inputs.
Remote Pairing
Following On-Screen Pairing Instructions
Once the "Pair Your TV Remote" screen appears:
- Follow the on-screen instructions to pair your remote control with the device
- The remote will complete the pairing process automatically
- Once paired successfully, a "Welcome" message will appear on your TV screen
Note: You will use your EVO Force-1 remote control for the rest of the setup process.
What to Do If Pairing Screen Doesn't Appear
If you don't see the pairing screen:
- Use your TV's remote control to verify the correct HDMI input source is selected
- Check that the power cable is properly connected to both the device and wall outlet
- Ensure the HDMI cable is fully inserted at both the device and TV ends
- Wait 30-60 seconds for the device to fully boot up
- If the screen still doesn't appear, unplug the power adapter, wait 10 seconds, and plug it back in
Network & Account Setup
Selecting Language (English United States)
- Once the "Welcome" message appears, you'll see a language selection screen
- "English (United States)" should be pre-selected
- Press the "OK" button (center button on your remote's directional pad) to proceed
Connecting to Wi-Fi Network
- You may see an optional screen asking to "Set up with Android phone" - select "Skip" unless you want to copy settings from an Android device
- The Wi-Fi network selection screen will appear
- Use the directional pad on your remote to navigate through the list of available networks
- Select your Wi-Fi network name and press "OK"
- Enter your Wi-Fi password using the on-screen keyboard
- Navigate between letters using the directional pad and press "OK" to select each character
- Once you've entered the complete password, select "Connect" or "Done"
- A screen will confirm that the device is successfully connected to the Internet
Tip: Wi-Fi passwords are case-sensitive. Double-check your password entry for accuracy.
Note: After connecting to the Internet, your device may download software updates and reboot. This is normal and may take a few minutes.
Google Account Sign-In Options
After connecting to Wi-Fi, you'll reach the Google Account sign-in screen:
If you have a Google Account:
- Select "Sign In"
- Enter your Google username (email address)
- Enter your Google password
- Continue with the setup process
If you don't have a Google Account:
- Select "Sign In" and then "Create Account"
- Follow the on-screen prompts to create a new account, OR
- Visit accounts.google.com on a computer to create an account first, then return to this step
If you want to skip this step:
- Select "Skip"
- You can add a Google Account later through device settings
Important: Without a Google Account, you will not be able to install additional apps from the Google Play Store. However, your FC Connexion TV service will work normally.
FC Connexion Account Login
After completing the Google Account setup (or skipping it), you'll see the FC Connexion login screen:
- Enter your FC Connexion User ID using the on-screen keyboard
- Enter your FC Connexion Password
- Select "Sign In" or press "OK" to log in
Need Help? If you don't have your FC Connexion login credentials or need assistance, contact FC Connexion Technical Support at 970-207-7873.
Final Configuration
Accepting Terms of Service
- You'll see a Terms of Service screen with three options to review:
- Terms of Service
- Privacy Policy
- Play Terms of Service
- You can select any of these to review the details
- When finished reviewing, highlight "Accept" and press "OK" to continue setup
Configuring Google Services
- The Google Services screen will appear with options like "Use location" and "Help improve Android"
- Review each option and check or uncheck boxes based on your preferences
- These settings can be changed later in your device settings
- Highlight "Accept" and press "OK" to continue
Google Assistant Setup:
- Select "Sign in" to link your Google Account for full voice features
- Choose "Use Assistant without sign in" for limited voice features
- Select "Skip" to continue without Google Assistant
- Highlight your choice and press "OK"
Search Across Apps:
- Select "Allow" to let Google share voice requests with your TV's apps for broader search results
- Choose "No thanks" to continue without cross-app search
- Press "OK" to proceed
Naming Your Device
- You'll see a screen to "Choose a name for your device"
- Select one of the default names from the list (such as "Living Room" or "Bedroom"), OR
- Select "Enter custom name..." to create your own device name
- Press "OK" to confirm your selection
Tip: Choosing a descriptive name helps identify your device if you have multiple EVO boxes in your home.
Installing Additional Apps
- The screen will show suggested apps available from the Google Play Store
- Select or deselect any apps you want to install now
- Select "Continue" to proceed
- Press "OK" on your remote four (4) times to navigate through the feature screens
Note: You can add or remove apps at any time later through the Google Play Store.
Completing Setup
TV Brand Detection and Pairing
- Your device will attempt to automatically detect your TV brand
- Confirm the detected TV brand is correct and select "Next" to continue
- If the wrong brand is detected, choose "Change TV" to select the correct brand
- Follow the on-screen pairing steps to pair your remote with your TV
- You'll be prompted to test the remote functions (power, volume)
- If the test is successful, select "Yes" and then "Next"
- If the test fails, select "No" and the device will try additional codes
What This Does: Pairing your remote with your TV allows you to control TV power and volume using your EVO remote instead of needing two separate remotes.
Audio Receiver Setup (Optional)
If you have an audio receiver, soundbar, or surround sound system, select "Next" to include it in setup
- If you only use your TV's built-in speakers, select "Skip" to continue without a receiver
- If you selected "Next," follow the same pairing process as with your TV
Accessing Live TV and TV Guide
- After completing all setup steps, the FC Connexion TV app will start on the Home page
- Follow the on-screen instructions to access Live TV
- Use the menu to explore options like the TV Guide
Congratulations! Your EVO Force-1 is now set up and ready to use. Enjoy your FC Connexion TV service!
Need Additional Help?
If you experience any issues during setup or have questions, contact FC Connexion Technical Support:
Phone: 970-207-7873
Hours: Available to assist you with setup and troubleshooting
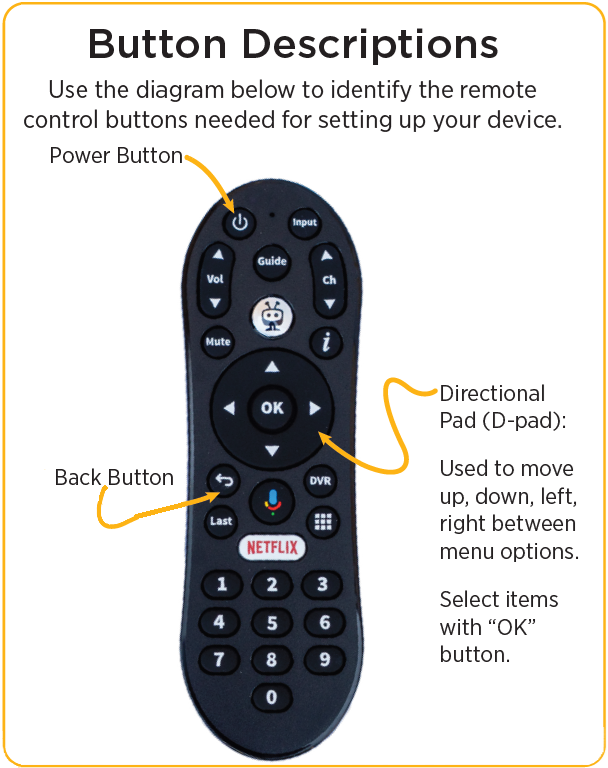
Quick Reference: Remote Control Buttons
- Power Button: Turn device/TV on or off
- Back Button: Go back to previous screen
- Directional Pad (D-pad): Move up, down, left, right between menu options
- OK Button: Select items (center button of directional pad)
- The amber light at the top of the remote indicates the remote is active when you press any button.
Was this article helpful?
That’s Great!
Thank you for your feedback
Sorry! We couldn't be helpful
Thank you for your feedback
Feedback sent
We appreciate your effort and will try to fix the article